
 cs
cs ja
jaIntroduction / Tech-specs
The CamStreamer App is a smart, in-camera application designed to stream live video directly from Axis IP cameras to platforms such as YouTube, Facebook, and many others.
Key Points
- Runs natively on an IP camera as an ACAP application.
- Streams live video directly from Axis IP cameras to platforms like YouTube, Facebook, and many others.
- Utilizes the Axis IP camera’s internal computing power to push the video feed without requiring extra equipment, a public IP address, or complex configuration.
- Features flexible audio integration from a camera microphone, RTSP audio from other Axis devices.
- Deeply integrates with YouTube to offer 24/7 streaming with health monitoring and a stream keeper to prevent stream closure during temporary camera offline periods.
- Integrates with Facebook for manual or scheduled streaming directly to pages or timelines.
- Supports multiple streaming protocols, including RTMP/RTMPS (push), SRT, HLS Pull, HLS Push, and MPEG-TS DVB/ATSC.
- Supports stream triggering methods:
- Manual control via the user interface.
- Automatic triggering via scheduling (one-day or weekly occurrence).
- API-triggered commands for starting, stopping, or creating streams.
- Physical triggering via an external button connected to the camera.
Technical specifications
API: Supported for starting, stopping, and creating streams.
Application type: In-camera ACAP app uploaded via web browser on the local camera IP address or loaded via AXIS API.
Compatible cameras: All Axis cameras, with specific functions available for new ARTPEC (6/7/8/9) and new AMBARELLA processors.
Trial: 30 days.
License: One-time payment or Cloud monthly payment.
Licensing methods: Via user interface (internet needed) or via API.
Management & Access
- System Access: Accessible via the web on the camera’s local IP address or remotely through the CamStreamer Cloud and Control Panel.
- Mobile Control: Offers a CamStreamer Mobile App for iOS and Android to monitor live lists, view previews, and toggle streams; this requires a combination with a CamStreamer Cloud service.
Setup
How to use CamStreamer App 1.6.0
Stream configuration
Set up your stream using the simple user interface and the parameters below.
Note: Video quality is taken directly from the camera. If you want to change it, please adjust the video settings in the camera itself.
If the camera does not have a ‘camstreamer’ user, create one with viewer permissions and use its password in the settings. Please don’t forget to manually restart the app before using it with new/updated user.
PARAMETERS
- Enable – turns live streaming on or off
- Media Server URL – streaming address of your platform, including the stream key. If you also want to use a backup server, set it in the following format.
rtmp://a.rtmp.youtube.com/live2/[STREAM-KEY]|rtmp://b.rtmp.youtube.com/live2?backup=1/[STREAM-KEY] - Audio Source – available options:
No audio – fillnonein the audio source field
Internal microphone – filldefaultaudio to the audio source field, and set audio=1 to Vapix RTSP parameters
Silent audio track – our internal silent audio file, used to enable streaming on platforms like YouTube and Facebook that require an audio trackfile: /usr/local/packages/netrexcamstreamer/tools/silence.mka
Audio from external RTSP source URL:rtsp://root:password@IPaddress/axis-media/media.amp?audio=1&video=0 - Audio-video synchronization (ms) – Use this option to synchronize external audio with the video. The offset is given in milliseconds and can be positive or negative.
- Vapix RTSP parameters – here you can set custom RTSP parameters, if you use internal microphone, set there audio=1
- User Password – password for the root user used to fetch the RTSP stream locally
Stream to YouTube
- Go to the YouTube homepage
- In the top right corner, click on “Create” (camera icon with a “+”).
- Select “Go live“.
- Copy the Stream URL and Stream key.
- Enter them into the streaming URL in the following format:
rtmp://a.rtmp.youtube.com/live2/yourStreamKey
Stream to Facebook
- Go to Facebook Live Producer (https://www.facebook.com/live/producer).
- Click on “Go Live”.
- Select “Streaming Software”.
- Copy the Stream Key.
- Enter the following streaming URL into your encoder:
rtmp://live-api.facebook.com:80/rtmp/yourStreamKey - Enable streaming from CamStreamer App
- Go back to Facebook Live Producer and click “Go Live” to start broadcasting.
How to create an RTMP stream to Flashphoner
By default Flashphoner does not offer a streamkey which is a required parameter to create/start an RTMP stream to a CDN/streaming platform.
CamStreamer:
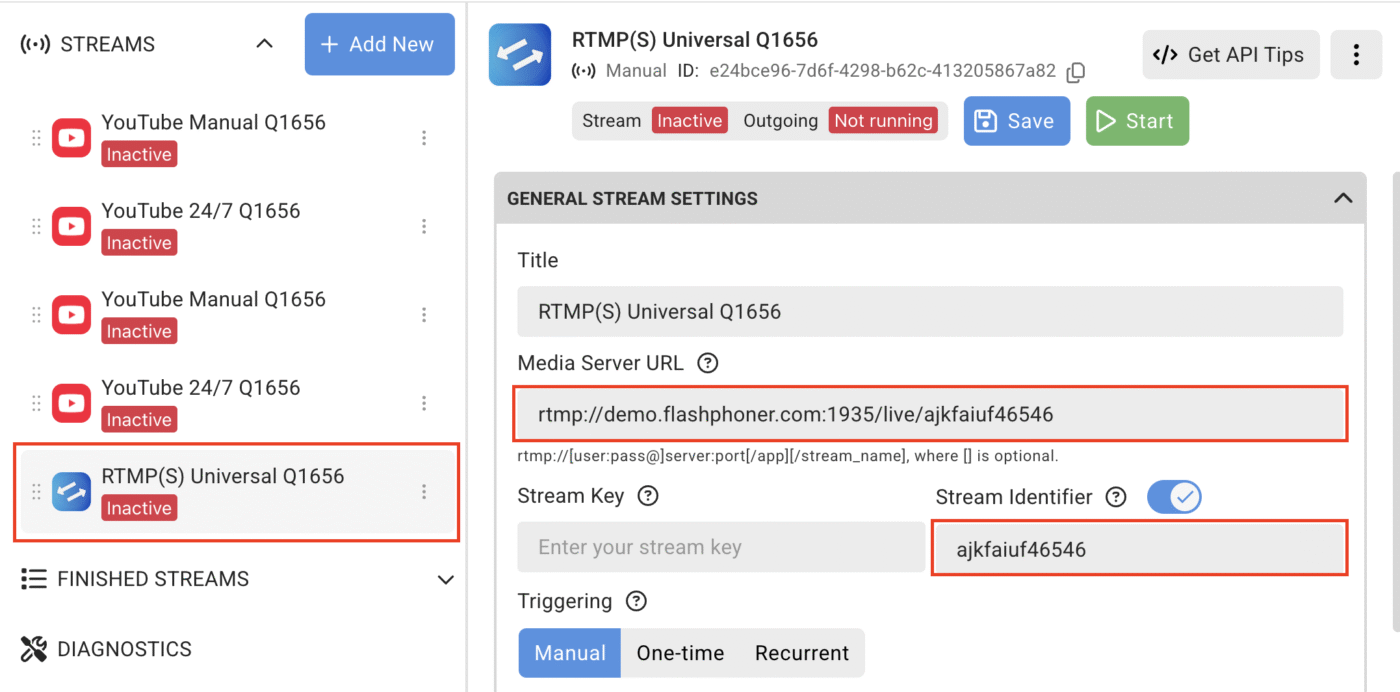
On the Camstreamer stream manager, create your RTMP stream.
Enter the media server URL as: rtmp://demo.flashphoner.com:1935/live/
Create your own alphanumeric stream key. Here we are using ajkfaiuf46546 as an example.
Paste that as well in the URL, the result ending as, rtmp://demo.flashphoner.com:1935/live/ajkfaiuf46546
Under the advanced options, paste your created stream key, ajkfaiuf46546 in the Stream Identifier option as well.
Finish setting up the other stream parameters and press Start
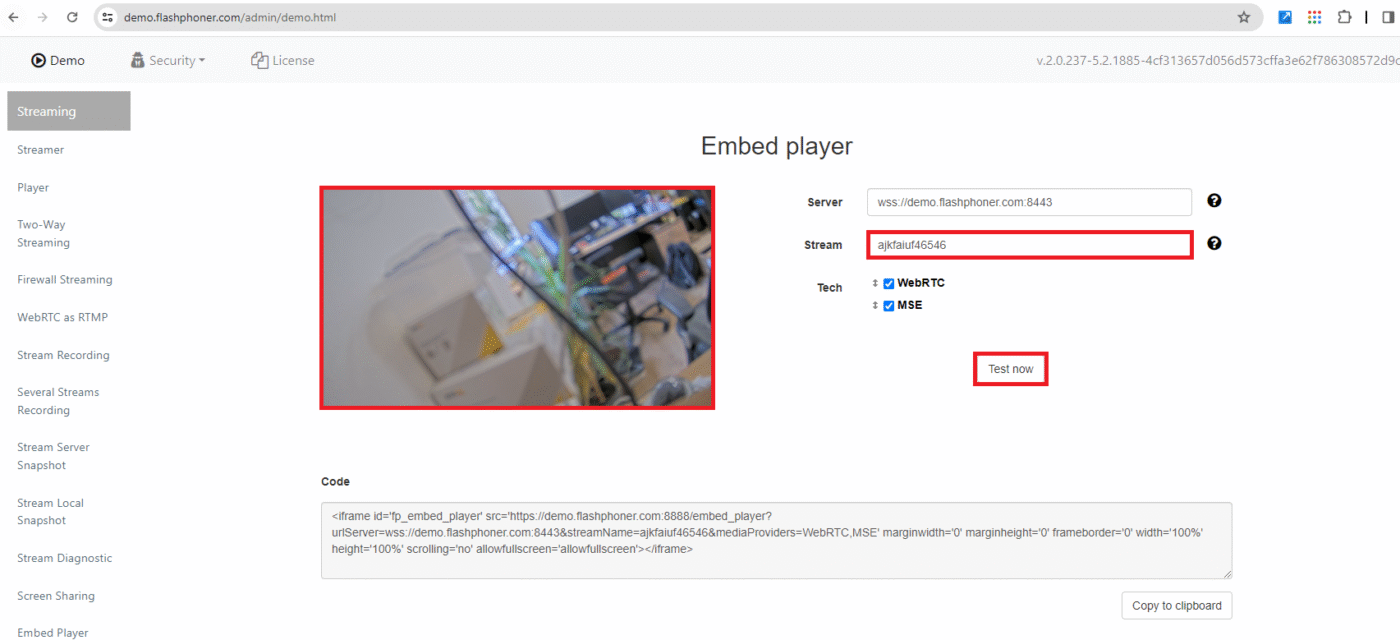
Flashphoner web interface
Here we are selecting the Streaming Tab with the Embed player option, note the guide can be used on the Player option as well.
Paste your streamkey ajkfaiuf46546 into the stream option as per our example
Once created hit the Test now button on the Embed player. afterwards hit play on the media player
Hit Start button on the Player
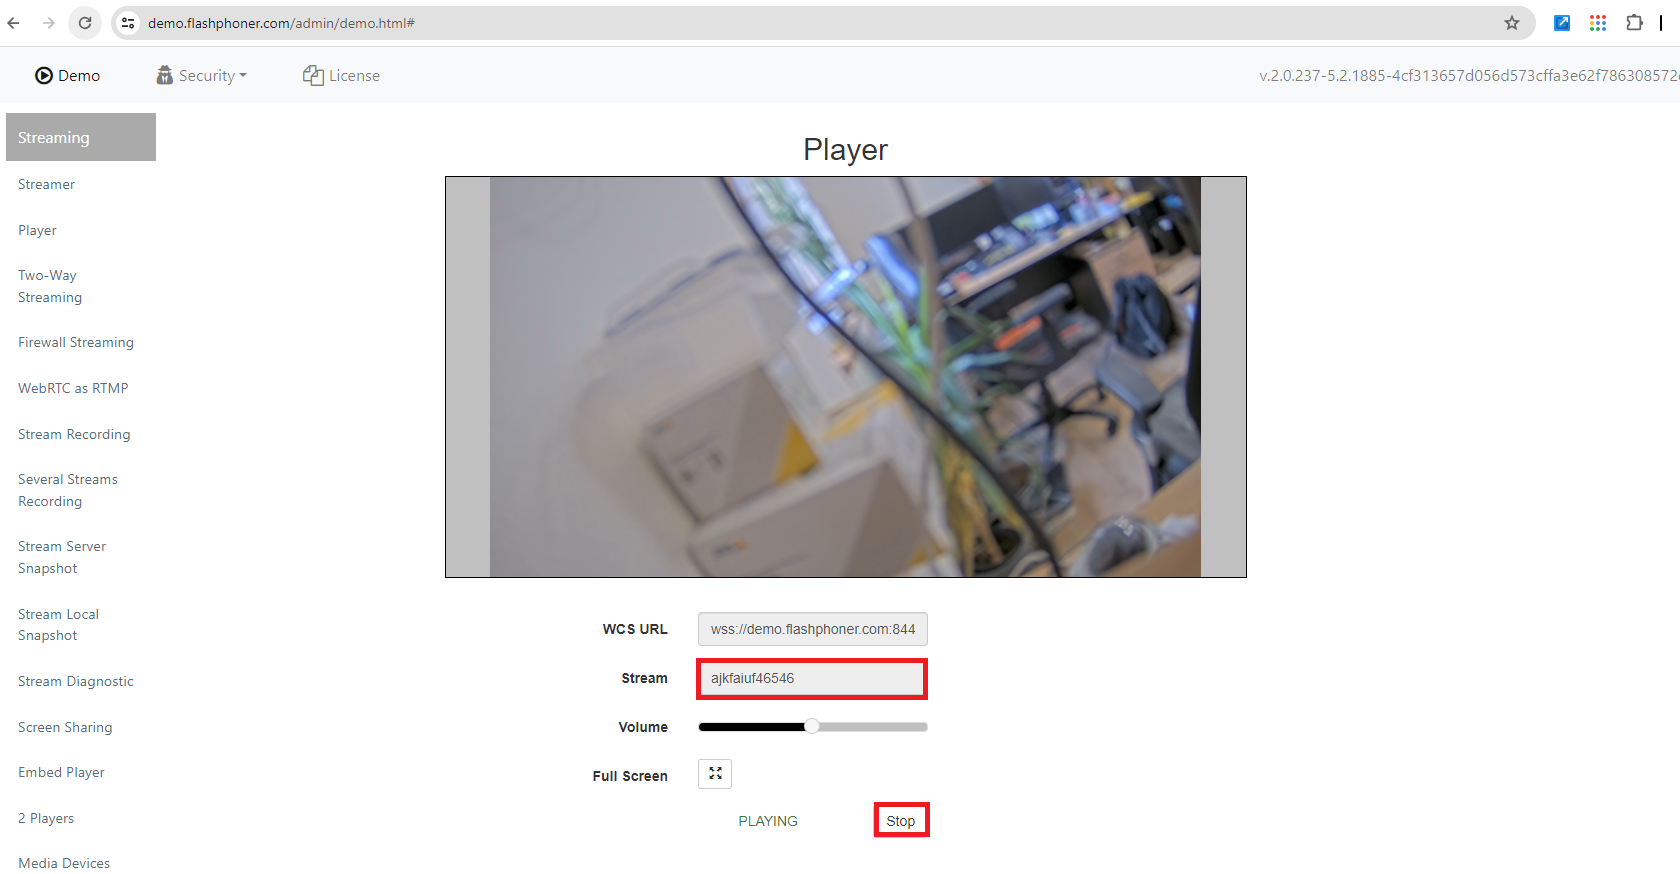
NOTICE
Please note: refreshing the Flashphoner browser or accessing any other Flashphoner settings/tabs during this time will enable loss of the live stream on the Flashphoner UI
WE DO NOT OFFICIALLY SUPPORT THIS RTMP STREAMING OPTION!
How to create an RTMP stream to Rumble via the CamStreamer app
How to embed YouTube videos without cookies
YouTube allows you to embed videos with the possibility of not collecting information about the viewer unless he plays the video.
When you turn on privacy-enhanced mode, YouTube won’t store information about visitors on your website unless they play the video.
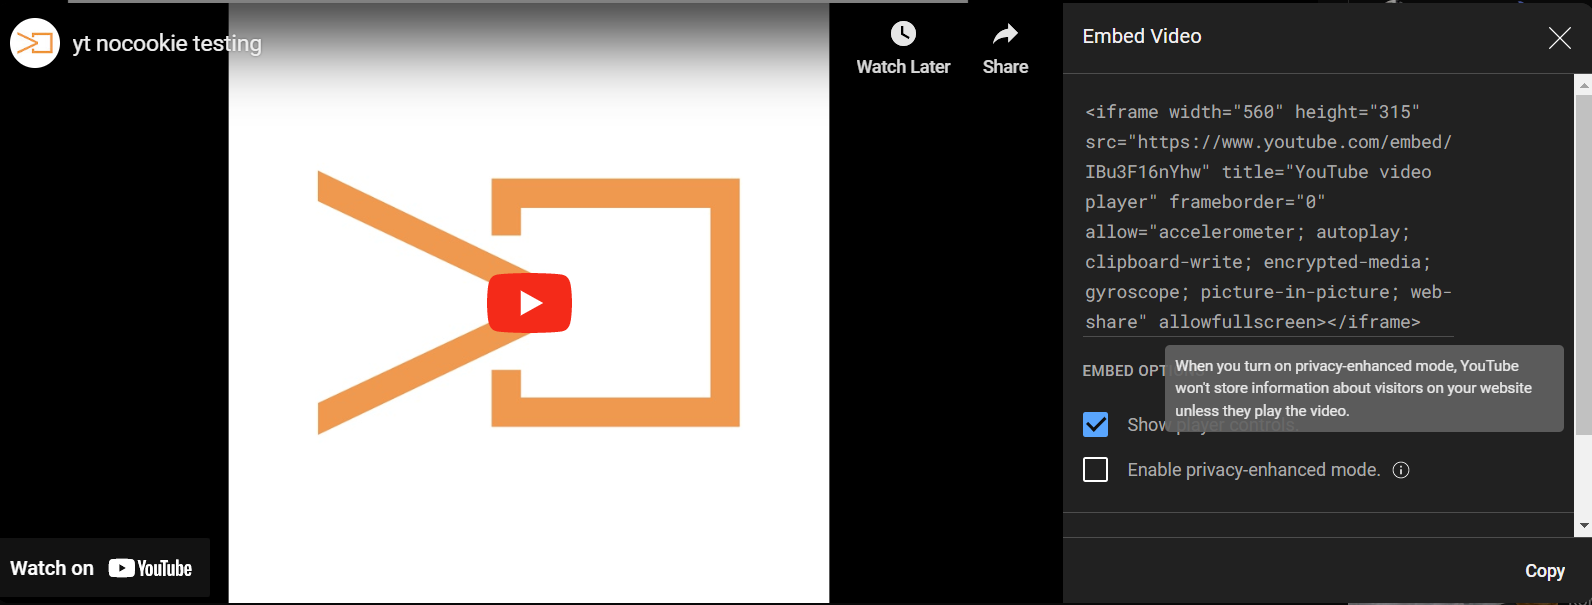
To display videos in this mode, add the parameter cookie=off behind the permanent link as in example below. Also, do not forget to set autoplay to 0.
<iframe src="https://camstreamer.com/embed/9OqoBDj1AQV9HV9V3jrffKKPOLAWsgU5sc123456?cookie=off&autoplay=0" style="border:none; overflow:hidden; width:560px; height:315px" allowfullscreen></iframe>How to create an RTMP stream to Kaltura Mediaspace
Kaltura Mediaspace
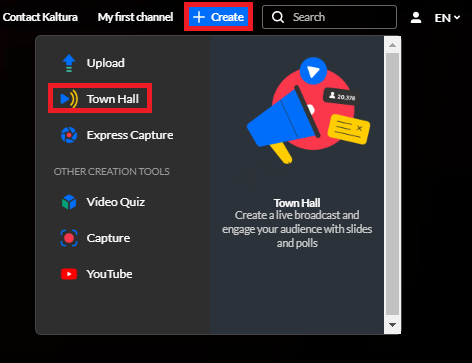
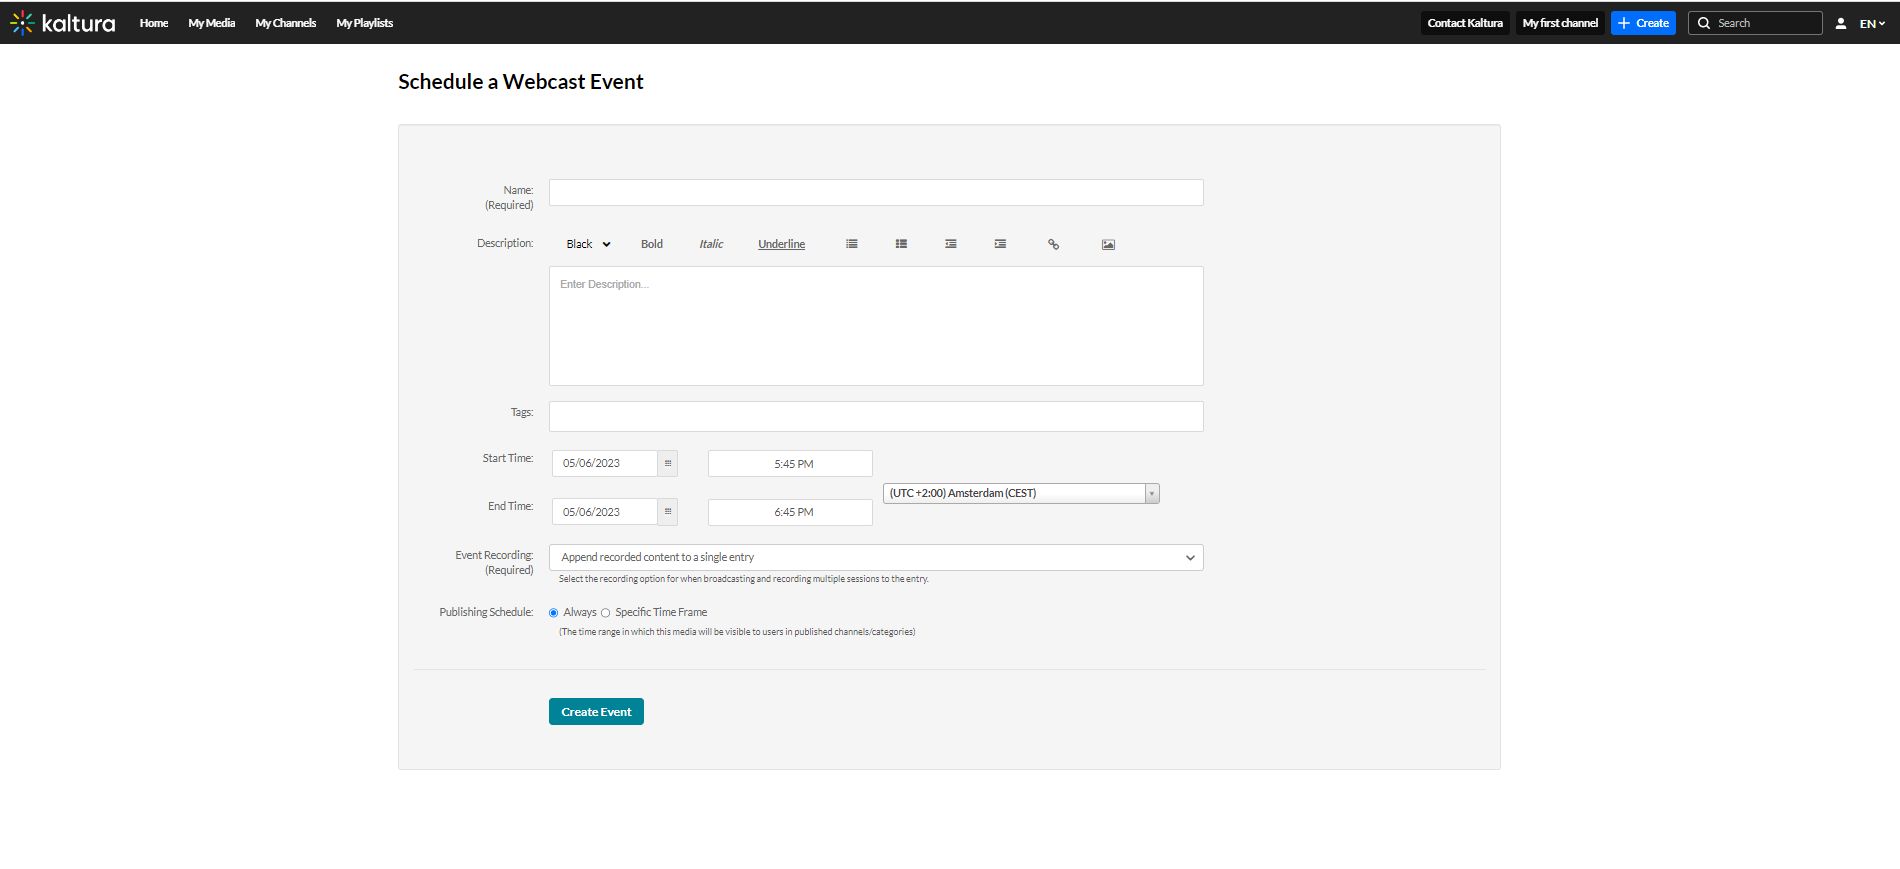
1) After successful login to Kaltura Mediaspace select +create to Schedule a Webcast Event
2) Fill in your details and configure the setup as per your requirements and press Save
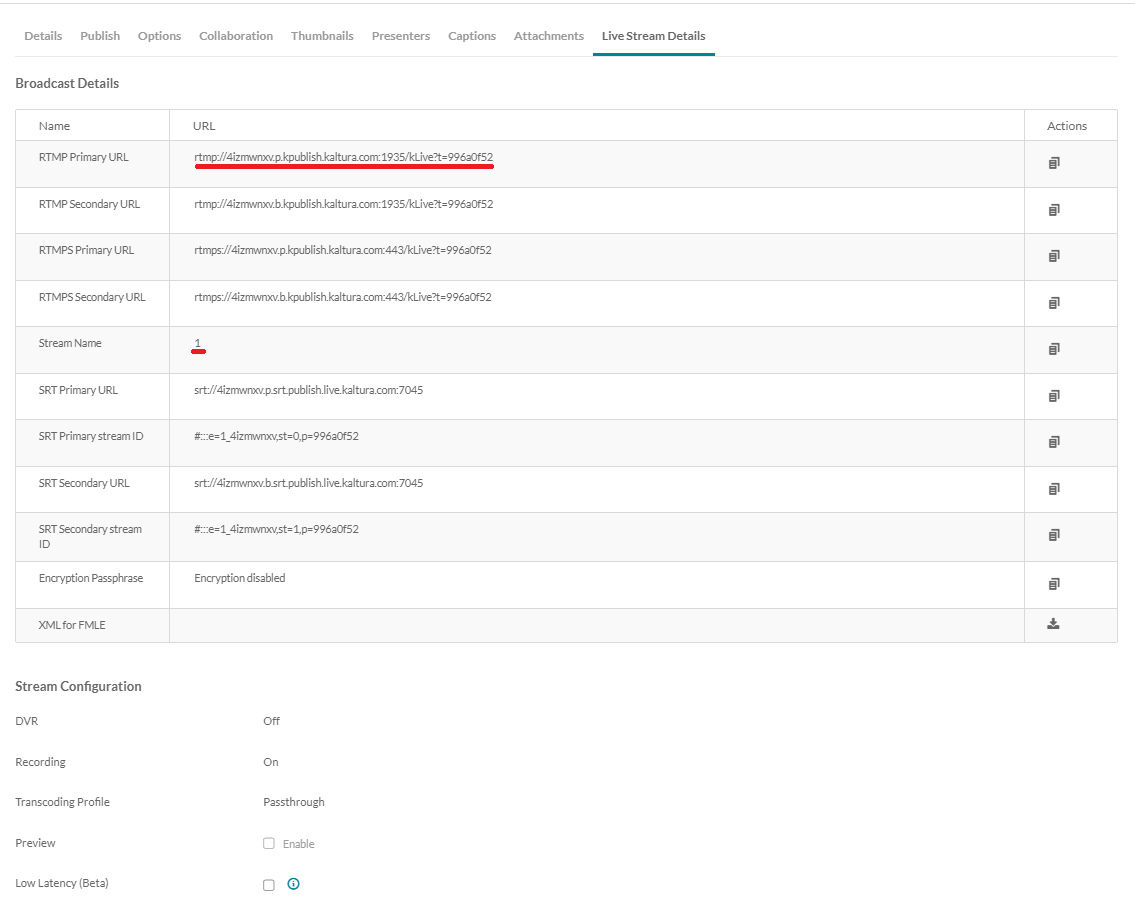
3) Then select Live Stream Details
The RTMP Primary URL and the Stream Name are the required parameters to insert into the CamStreamer stream settings
Camstreamer Stream Manager
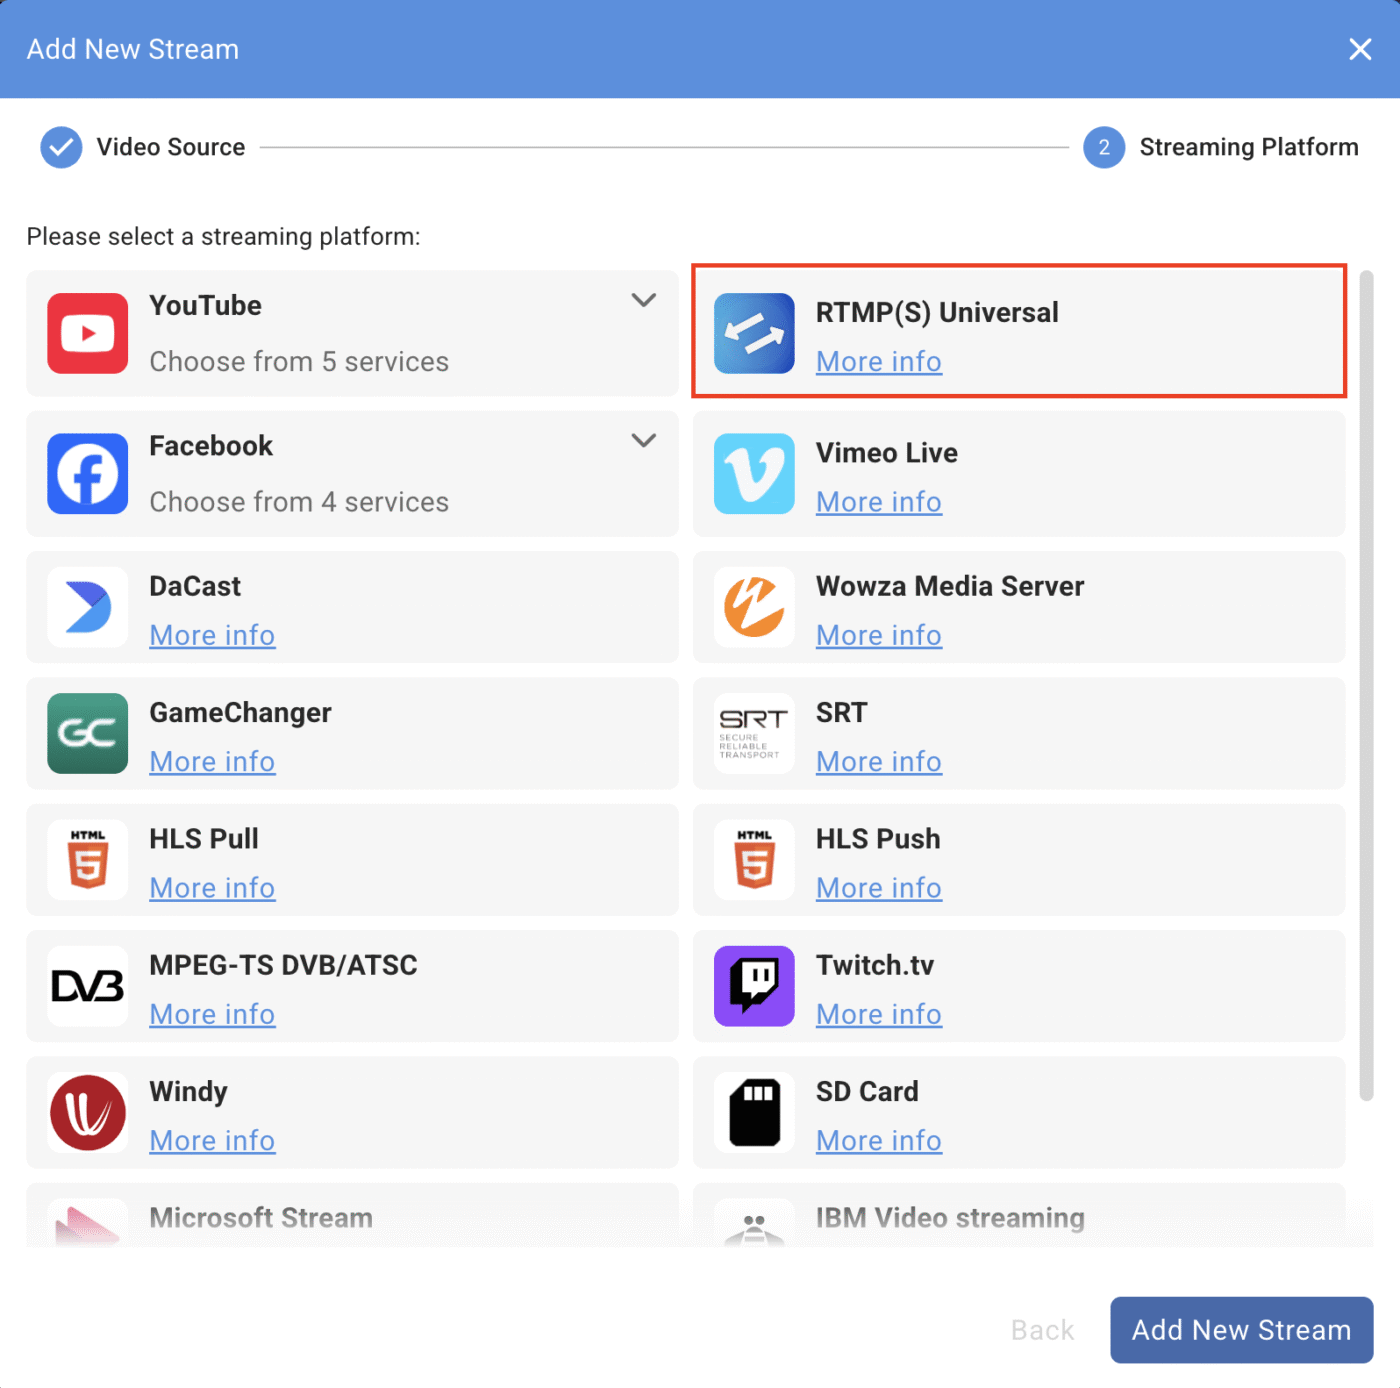
4) On the Camstreamer Stream Manager, select the appropriate Video Channel and then select the RTMP Ingest Server (Universal) option
5) Paste the Primary RTMP URL from the Kaltura Mediaspace into the Media Server URL option in the Camstreamer stream Manager
In General settings, set Stream identifier to the appropriate number which was received from the Stream name from the Kaltura Mediaspace (in most cases it is 1)
Configure the rest of the settings as per your requirements and save and start the outgoing stream

How to set up HLS streaming on AWS
To set up HLS streaming from Amazon Web Services via RTMP from the camera, follow this guide: https://aws.amazon.com/blogs/media/part1-how-to-send-live-video-to-aws-elemental-mediastore/
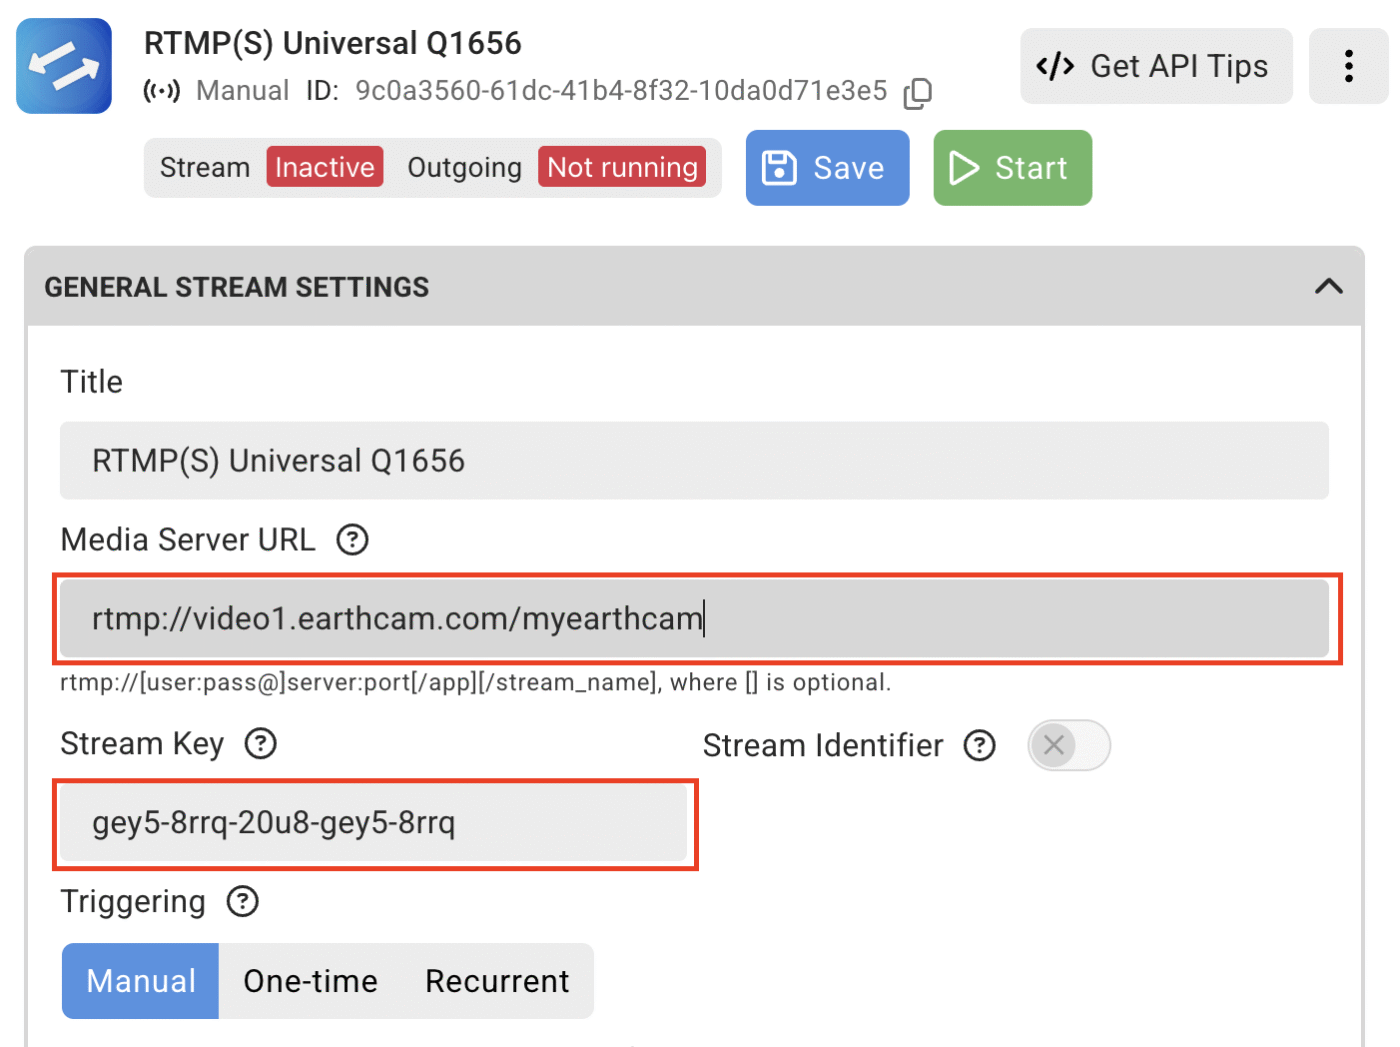
Settings of the stream to EarthCam
Use the service “RTMP/S Universal” and insert the address and the stream key in the following form: rtmp://video1.earthcam.com/myearthcam
and put the stream key into the input box:
Errors: Get camera time error, cannot check camera time
In most cases, this is due to incorrect settings of the DNS server. You can configure the local DNS server of the camera in the System>TCP/IP section.
Can I stream to more streaming platforms simultaneously?
Yes, with CamStreamer App 3.x (or higher), you can stream to more streaming platforms simultaneously. Please check https://camstreamer.com/download-app for the availability of CamStreamer App 3.x for your camera model.
Video
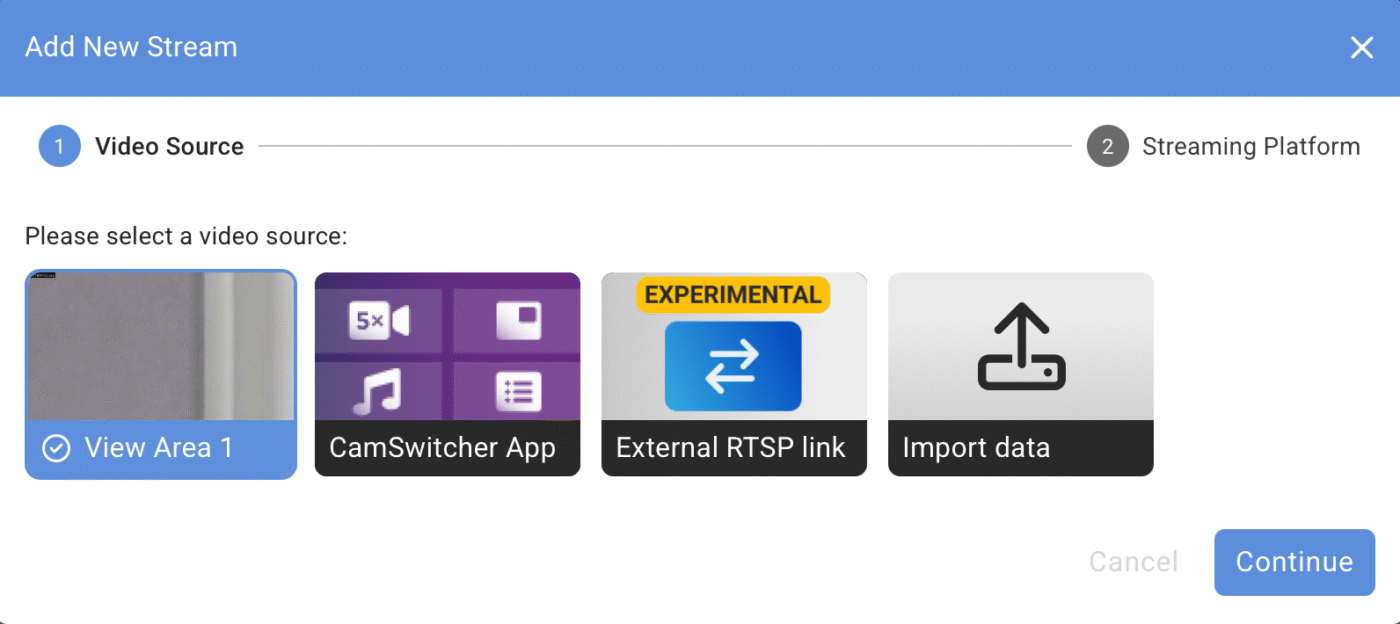
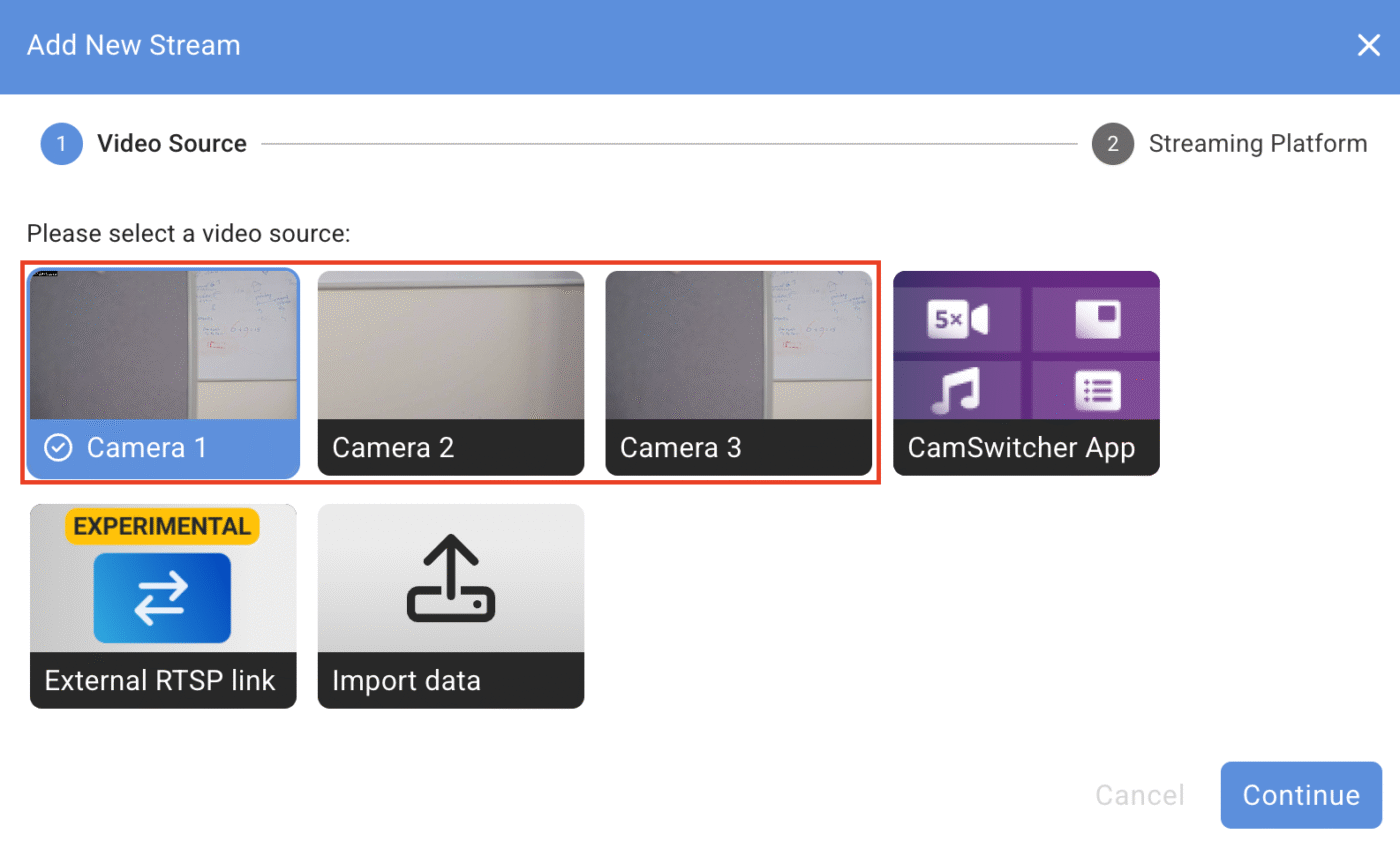
How do I select the appropriate view area/video channel for live streaming
On the CamStreamer Stream Manager, when you are adding a new stream on the Add New Stream tab, you will have the option to select the desired video channel.
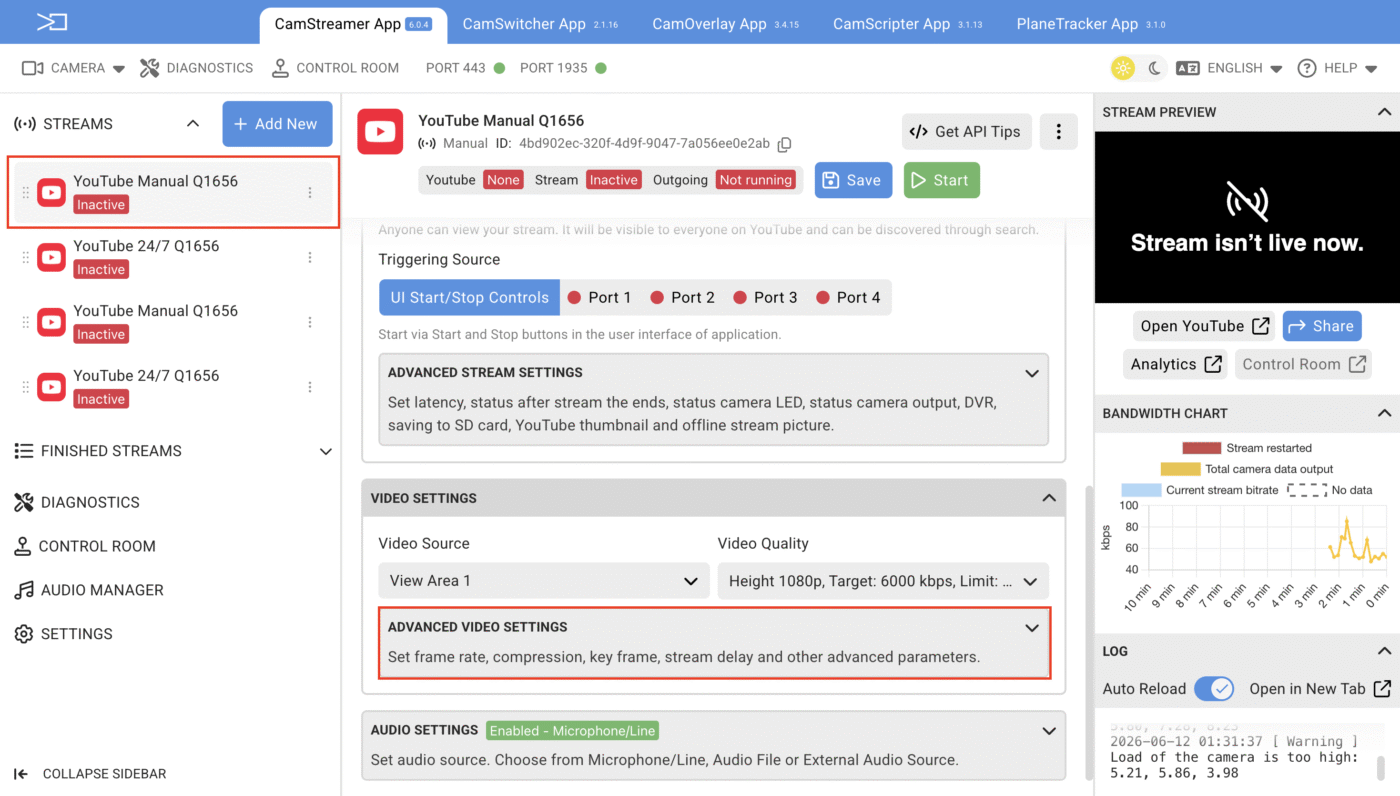
I have a PTZ-only camera and would like to set up 2 streams for live streaming, one stream with the overlays enabled and another stream with the overlays disabled.
The first stream you will set up as usual with the overlays enabled, whether via the CamOverlay App or the Axis UI.
On the second stream that you are setting up, where you wish to disable the overlays, the following should be done:
Select the second stream > video settings > advanced video settings > Vapix RSTP parameters and add the text overlays=off

NOTICE
The overlays=off parameter is usable from Axis firmware 9.8.3.3, whereas the other overlay parameters are only usable from Axis 10.5.2 firmware.
Additional Vapix RTSP parameters can be found here:
https://camstreamer.com/blog/basis-rtsp-parameters
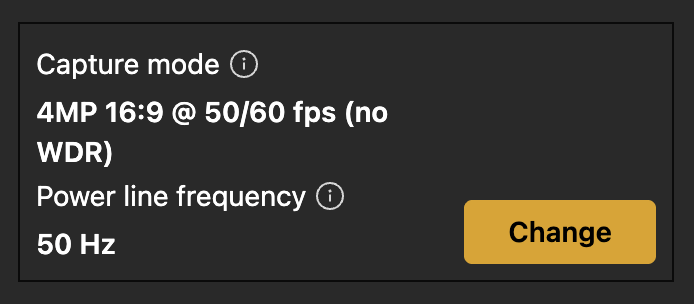
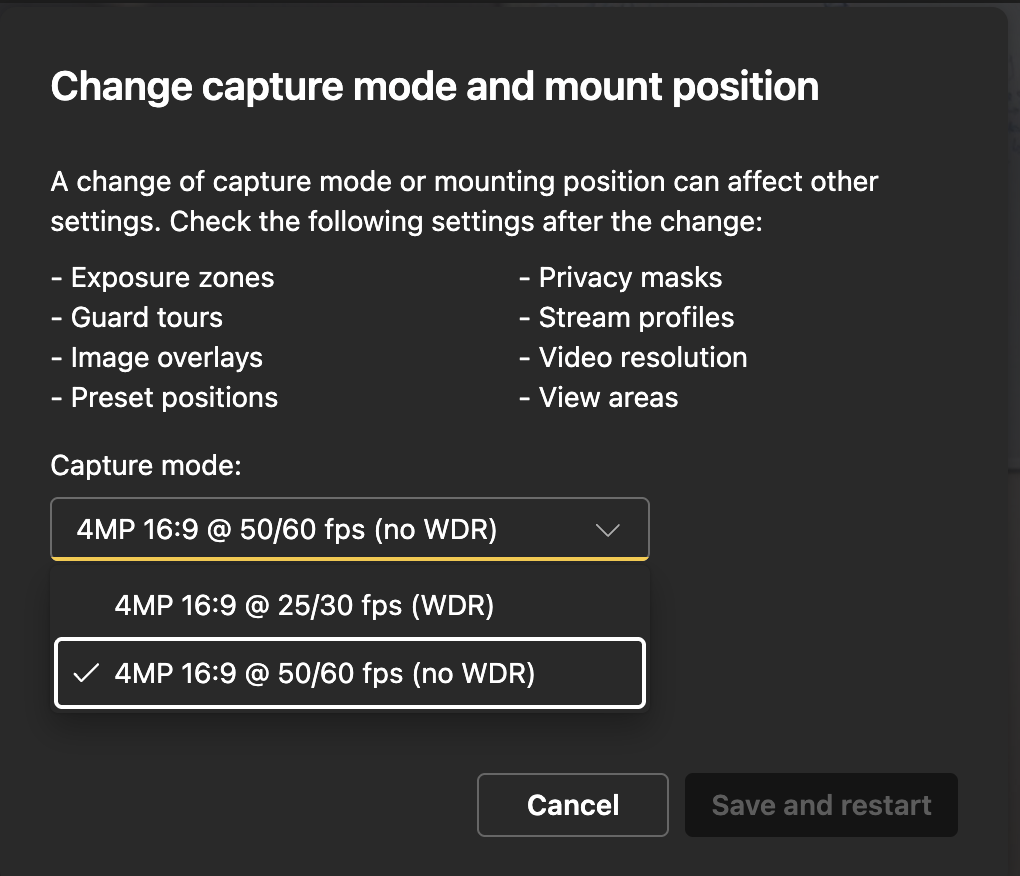
Why can’t my camera reach max FPS?
Axis cameras equipped with the ability of outputting 50/60/100/120 FPS should note.
Enabling the option of WDR (wide dynamic range) will automatically reduce the FPS output of the camera by half.
To turn off the WDR option, go to Axis camera UI > Video > Installation > capture mode, and change the capture mode to desired option.
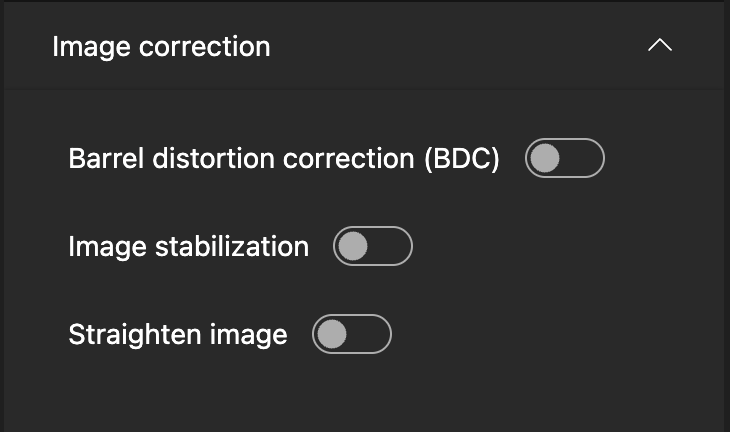
In addition, using the BDC (barrel distortion correction) option on the lens further increases the load on the CPU.
With regard to BDC, it would be better to use the zoom feature of the camera, thereby minimizing CPU processing power and further loss of FPS.
You may turn it off in the same section in the Image correction tab:
How to select different sensor/video channel in CamStreamer App
You can select different sensors of your camera or the View Area right before selecting the streaming service. See below.
Lagging/choppy stream
If you find that your stream is lagging or choppy, go through and test the following points:
- Use the CamStreamer Diagnostic tool to verify internet connectivity, bandwidth, and settings.
- Older model/chipset cameras do not have this option (due to limited memory). In this case, if the PC/notebook (which you are using to access the camera) is on the same local network, use a web-based speedtest application, like Ookla, to verify bandwidth.
- Please be aware of capped bandwidth limitations of various CDN providers, specifically on live streams.
- DPI: Deep Packet Inspection causes random network latency to your firewall, which the RTMP/HLS protocol does not like.
- Camera load – an overloaded camera will leave out frames. Reduce the camera load by:
- Checking/reducing the number of outgoing streams from the camera.
- Turning off other ACAP applications on the camera
- Reducing the audio sample rate (44.1Khz is sufficient for most CDNs).
- Camera load can be verified by accessing the camera GUI directly ( for stability, not exceeding 4.0 ).
New user interface – System > logs
Legacy interface – System > maintenance > reports
Use the default “Video Quality”. Selecting “custom” can lead to video sent to YouTube with the wrong parameters. See here.
Audio
Compatible external audio sources
External audio can be sourced from your Audio Equipped Axis camera.
In addition if your cam does not support audio capabilities and you wish to capture Live Audio there exists 3 options.
1. Via an Axis I/O audio module:
The C8110 Audio Bridge and the AXIS D3110 Mk II Connectivity Hub.
If you require standalone microphones to plug into these units, please see the Axis Product link:
https://www.axis.com/en-fi/products/standalone-microphones
Please note that the Axis T6112 audio I/O interface can only be used via a plugin into an Axis cam that has the audio input option. The audio source would then be derived from the cam that the T6112 unit is plugged into. But this unit is not compatible with all Axis cams.
Here is the list of compatible cams for Axis T6112 audio module:
https://www.axis.com/products/axis-t6112-audio-and-io-interface#compatible-products
2. Icecast
Wowza Media Systems
Stream to SHOUTcast and ICEcast
Send a live audio-only stream from Wowza Streaming Engine to SHOUTCast and Icecast CDN edge networks for distributed delivery
3. Deskcamera – create audio only stream and transmit Mic to RTSP
Static/Crackling noise on audio while Live Streaming
The common case scenario is that the camera is placed outdoors, where there is no way to determine the correct audio level adjustment. Then, when there are high gusts of wind or very loud wildlife activity, the static/crackling noise appears on the live stream audio.
This usually occurs due to an overload on the audio channel, specifically on YouTube.
The solution is to reduce the audio gain/output on the Axis camera GUI to remove the static.
HINT
In addition, we recommend setting your audio encoding on the Axis GUI to 44.1 kHz and lower the gain a little.
If your cam has an Artpec 5 processor, then 16kHz is recommended.
Stream sound from a different source / my camera does not have a microphone
CamStreamer App supports external audio sources via URL. If you want to use audio from another Axis camera in the same network, use the following URL:
rtsp://root:password@IPaddress/axis-media/media.amp?audio=1&video=0It also works with D3110 Connectivity Hub or C8033/C8110 Network Audio Bridge as:
rtsp://root:password@IPaddress/axis-media/media.amp?audio=1Moreover, if an external audio source is not available, our CamSwitcher app enables streaming audio from multiple sources, including live commentary, similar to how browsers handle audio in online meetings
https://camstreamer.com/camswitcher-about
Network
I can’t connect to the target video server (Please check DNS settings)
Your camera is not able to resolve the DNS address. There are two recommended solutions; pick one:
- Set DNS server 8.8.8.8 on your camera and allow DNS traffic to 8.8.8.8 and on your firewall
- Or configure a local DNS server for the camera. See Setup > System Options > TCP/IP > Advanced
How can I measure my connection speed?
You can measure it, e.g., on speedtest.net. See the upload speed value and ping time. Be sure you are on the same network as the camera. Additionally, use the Diagnostic Tool, which is part of the Camstreamer App, for more accurate evaluations.
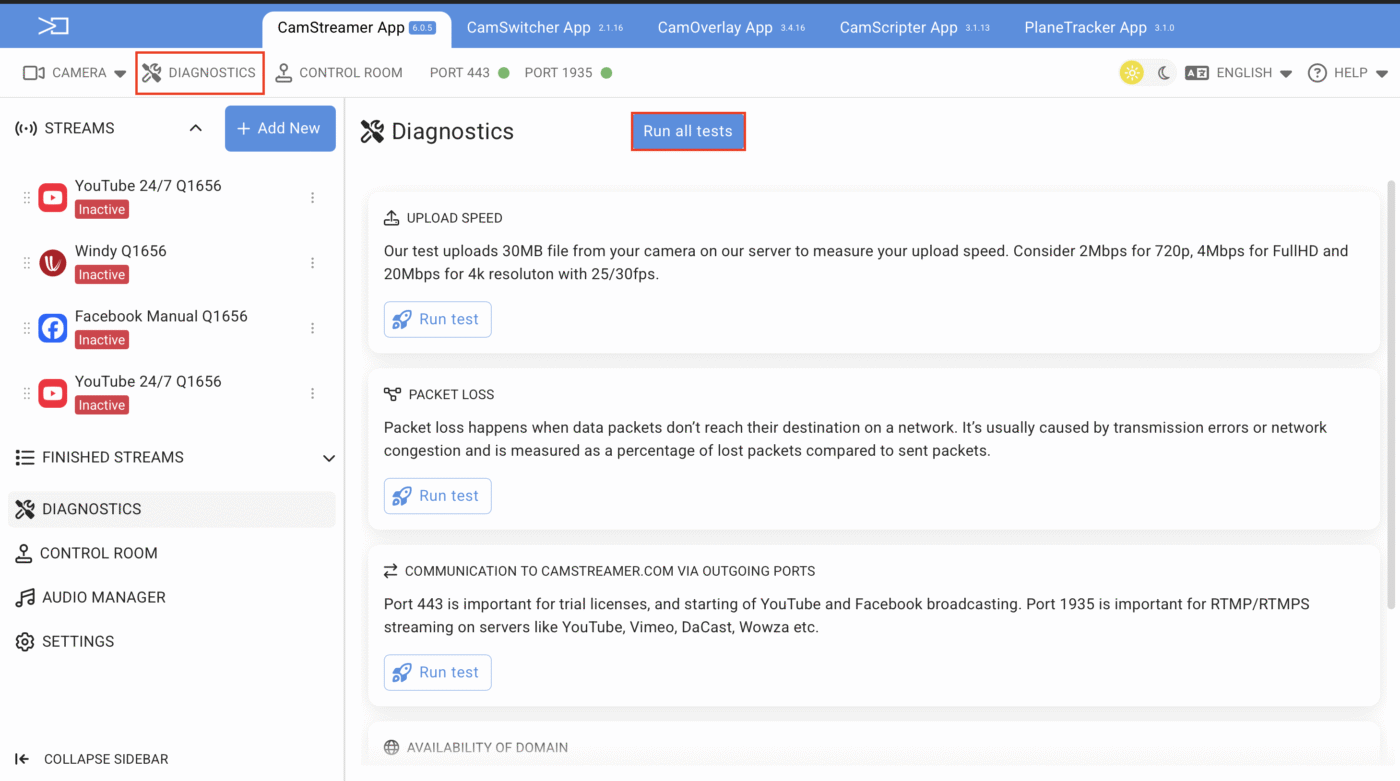
CamStreamer App Diagnostics Tool
If there exists an already outgoing stream, then the result that is being displayed is additional bandwidth.
If no outgoing stream exists at present, then the result that is being displayed is the total available bandwidth.
What is the required connection speed?
It depends on video quality and motion in the video. A video in resolution 1080p at 25fps would need at least 4Mbps in the upload direction. The ping time should be less than 100ms.
Check also recommendations from YouTube here.
Camera Time Verification is necessary with Trial License
- A camera utilizing a trial license requires an internet connection on the camera and port 443 to be opened in your firewall to allow outgoing traffic to CamStreamer.com.
- Also, confirm that you have configured the local DNS settings correctly.
- If local DNS settings do not work use eg. 8.8.8.8 or 8.8.4.4
- Ensure this is also set in Axis cam UI System>Plain Config>HTTPS>Port443
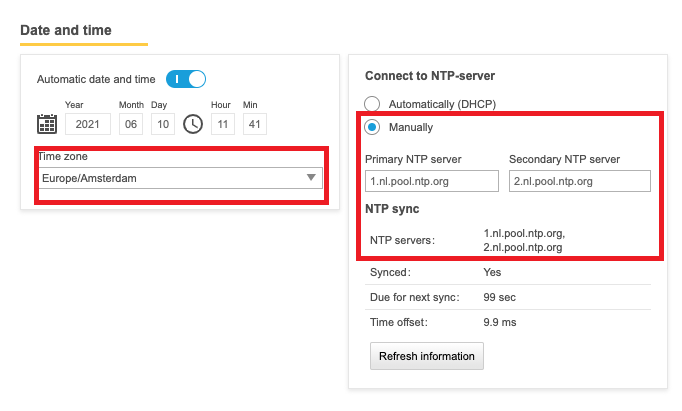
- It is also important to configure the correct time zone of your camera’s placement.
- In most cases, you will need to connect to an NTP server for correct time alignment so that the CamStreamer server can confirm the license validity.
We recommend setting NTP servers on servers from https://www.pool.ntp.org
Use your country location from the NTP servers and paste it in.
Axis camera interface > system > date and time > secondary NTP server.
Find and use the CamStreamer Diagnostic Tool
Youtube – General
YouTube recent policy update for creators: max concurrent broadcasts
We have recently become aware that users have stated that the newly created outgoing streams are Active and Outgoing but the YT status remains Ready, not Live and the preview image remains blank

YouTube has reportedly restricted the number of concurrent live streams allowed per stream key or channel. At this time, no official public announcement has been released. Users should confirm this update by reviewing their YouTube Channel or YouTube Studio settings.
At present, there is no clear indication regarding the maximum number of live concurrent streams that each channel can support simultaneously
You can refer here:
support.google.com
This article summarizes recent and past updates made to YouTube’s policies. For other updates relevant to YouTube creators, check out our Creator updates. Latest updates
Live stream taken down due to…… violation of terms of service
CamStreamer does not monitor content streamed to YouTube/Facebook/Wowza or any other publicly accessible CDN via the CamStreamer applications.
Live-streamed content via the Camstreamer apps is solely based on the user’s discretion and preferences, whether video or audio , and it is the user’s responsibility to conform to and adhere to the required CDN platform requirements and regulations
If and when there is a discrepancy or violation of rules being incurred, it should be addressed directly to the concerned CDN platform that has implemented the strike/penalty.
In most cases, the user is offered the opportunity to appeal the penalty/strike with the CDN from whom it was inflicted.
How to Securely Stream to YouTube
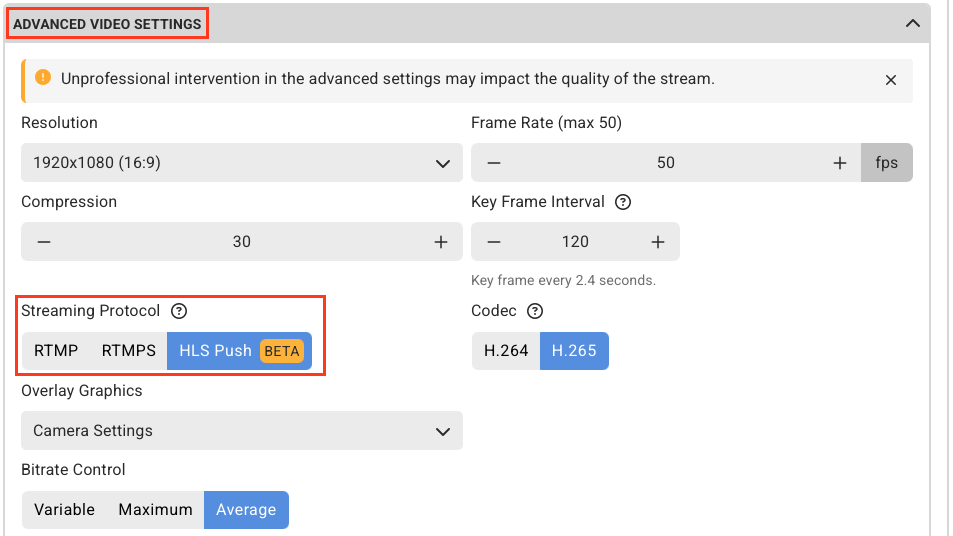
You have two options for secure streaming, both of which can be configured under Advanced Video Options > Streaming Protocol.
- Option A: HLS
- How it works: Streams over HTTPS.
- Best for: All streams, especially high-quality/high-bitrate video. It runs smoothly and securely.
- Option B: RTMPS (Recommended)
- How it works: Encrypts the stream, but requires heavy processing power.
- The downside: The camera’s hardware struggles to reliably encrypt high-quality/high-bitrate streams using this method.
HINT
We recommend using RTMPS with H. 265 or AV1 codec
Does YouTube allow embedding of my channel?
We have confirmed that YouTube allows embedding again.
In your YouTube studio:
New and existing users will create a new channel, and the streams created in that new channel will have the option to be embedded.
All streams will have to be set each time manually, and that includes Recurrent Scheduling.
For the 24/7 streaming option, you need to set it only once.
Go to your YouTube studio
Dashboard > Content > Live > choose your live video > pen details > scroll down to show more > scroll to allow embedding
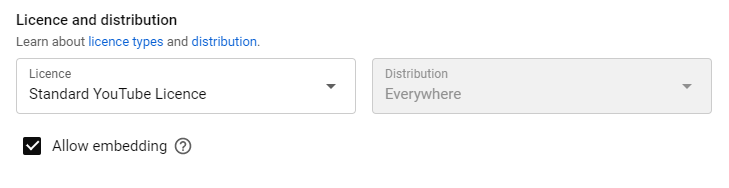
Allow Embedding option does not save on YouTube
YouTube does not allow embedding for new accounts without 1K subscribers, 4K watch hours, and connection with an AdSense account. Unfortunately, they do not reflect it in the stream settings and do not display any information about the reason.
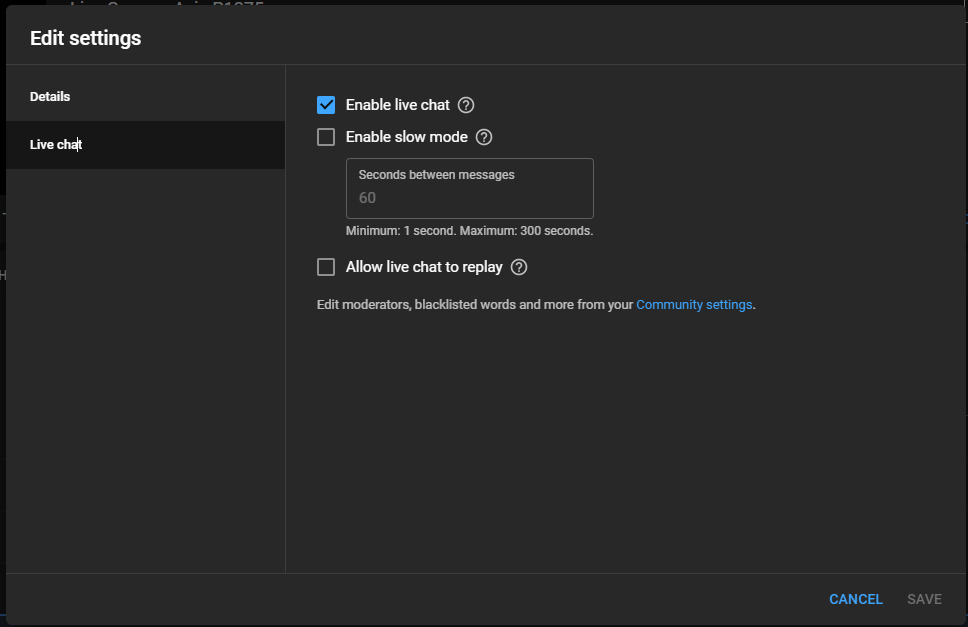
How to turn-off live chat on YouTube
Unfortunately, this function cannot be controlled via API so you need to disable live chat on YouTube directly.
1. Go to Live Control Room via the button beside the video preview in the stream settings

2. Confirm first settings if it is required
3. Click “Edit” and disable live chat – see the screen below
Can I record a video?
Yes, a video can be recorded on YouTube. YouTube enables recording for 4-12 hours based on the quality and streaming latency mode. You can use a YouTube video editor to trim a video. If you need a local recording or more hours, please contact us.
General
How to purchase CamStreamer
Choose the product you want at https://camstreamer.com/#pricing and select the button “buy online”. You can pay by card or with PayPal. The best deal is the bundle with the CamOverlay app (for graphics added to the stream).
DVR playback on YouTube live streams skips/misses sequential timeline events/periods
Users have reported that the DVR 12-hour playback on the YT 24/7 streaming option is missing consistent timelines; recordings have been deleted (eg, recording timeline jumps from 01:00 am to 06:00 am)
We have confirmed this scenario that YT does not continue the recording when there are no current viewers watching the live stream.
NOTICE
This does not affect YT users globally and consistently, and this action can be random.
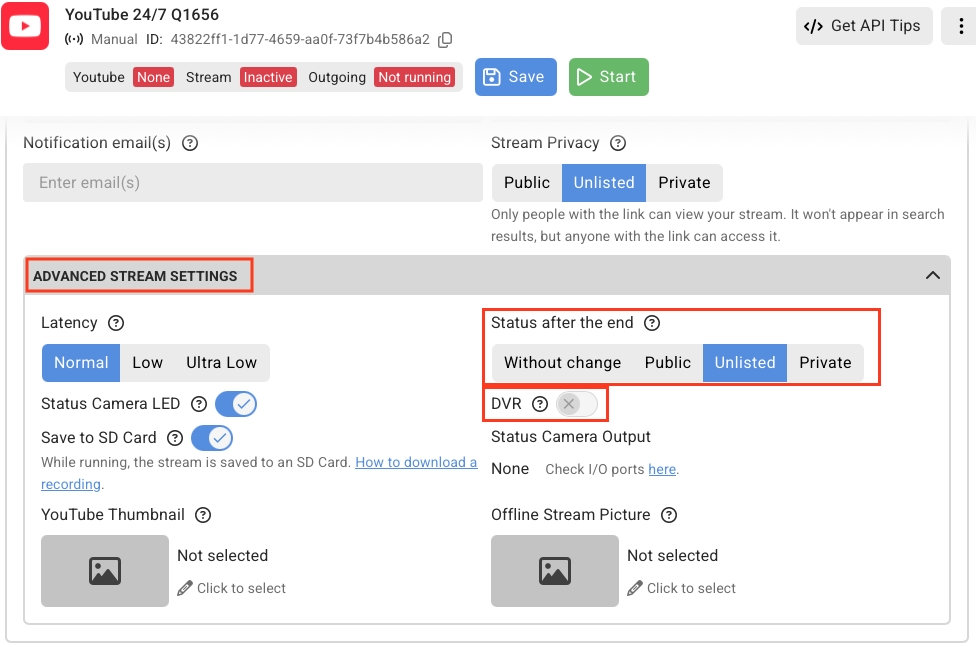
How do I prevent YouTube and Facebook from saving my live streams
During setup of the live stream on the Camstreamer stream manager, select the Advance stream settings tab
YouTube
disable/do not tick – DVR
Status after the end – Select > Unlisted/Private
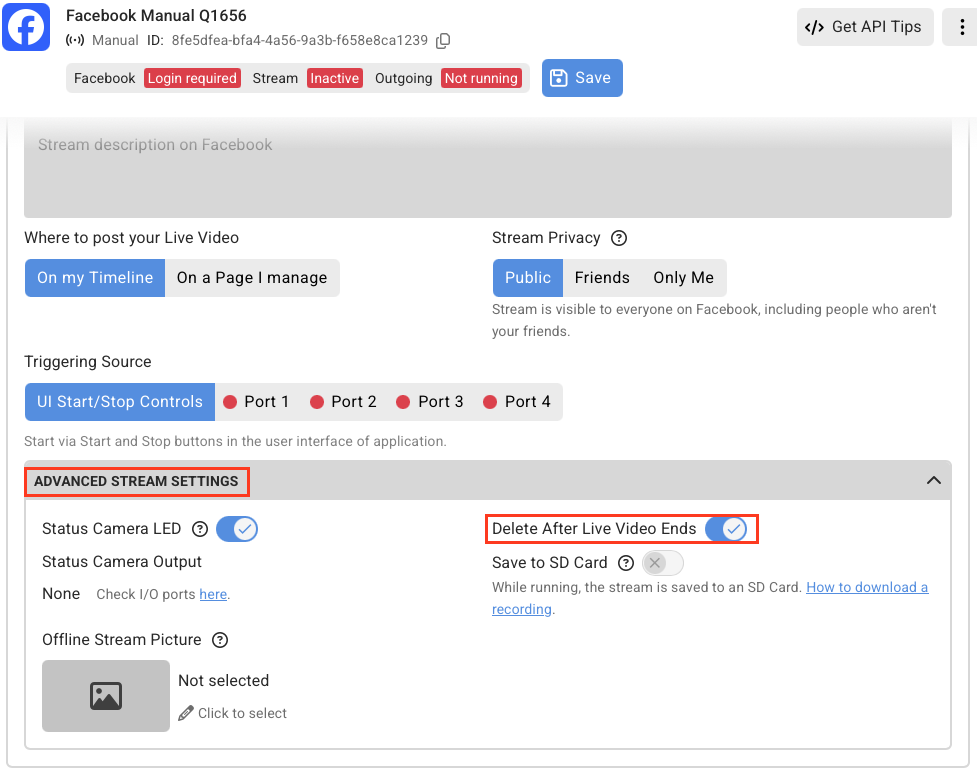
Facebook:
Simply select > Delete after live video ends
Browser preference
We recommend using Chrome (Windows) or Firefox (IOs) as we fully support it.
Please ensure you are using the latest releases of these browsers.
Error: Failed to create Facebook Live Stream. We limit how often you can post, comment or do other things in a given amount of time in order to help protect the community from spam.
It is a Facebook issue. We have found out that the password change of the FB account fixes this problem.
Decrease latency for HLS
There is a way to reduce the latency to 3 seconds if you optimize some parameters. Mind that there could be a problem to transfer it via Internet. The LAN streaming should be OK.
Here is the setup:
Segment time: 1
List size: 2 or 3
Video Options > GOV Length 25 (in case of 25fps … 1 key frame per second)
Start/Stop streams via API?
- You’ll need the ID of your stream, which can be found via an API call or in the Server Report of the camera.
- You can call the API to stop/start
Below are some examples of calls for CamStreamer App 3.x (more info in API section). You’ll need to change the password, IP address, and ID of your stream.
Active streams:
http://root:[email protected]/local/camstreamer/stream/list.cgiCall for stop:
http://root:[email protected]/local/camstreamer/stream/set.cgi?stream_id=13959&enabled=0Call for start:
http://root:[email protected]/local/camstreamer/stream/set.cgi?stream_id=13959&enabled=1Do I need to start my streams after restarting the camera?
No. All streams that were running or active will continue streaming or will start streaming within a set time.
Importing and Exporting Settings
Starting with CamStreamer version 6.0.0 and higher, you can easily back up and restore all of your streams and configuration settings.
How to Export Settings
- Open the CamStreamer interface and navigate to Settings.
- Click the Export all data button.
- Wait for the configuration backup (
.zipfile) to automatically download to your computer.
How to Import Settings
- Navigate to Settings.
- Click the Import your data button.
- Upload the
.zipbackup file you wish to restore. - Select your preferred import option:
- Add to existing: Merges the backup configurations into your current settings.
- Restore backup: Completely overwrites current settings with the backup data.
- Wait for the import process to finish.
IMPORTANT NOTICE
Stream Continuity: Active streams will continue broadcasting using the exact same YouTube Stream ID after the backup is imported. For this to work, the backup file must be imported onto the same camera from which it was originally downloaded.

Does Facebook support 24/7 streaming?
Facebook cancelled 24/7 streaming on 31 March 2020. More info here.
Can I broadcast my camera 24/7?
Yes, you can broadcast 24/7, e.g., to YouTube. For YouTube, we run a Watchdog on our server to notify you if the camera disconnects and to keep the broadcast running.
Do I need a running computer?
No, the video itself is pushed directly from your camera to streaming services. You need a computer just for the initial setup. You don’t need a running computer as with other solutions.
Maintenance
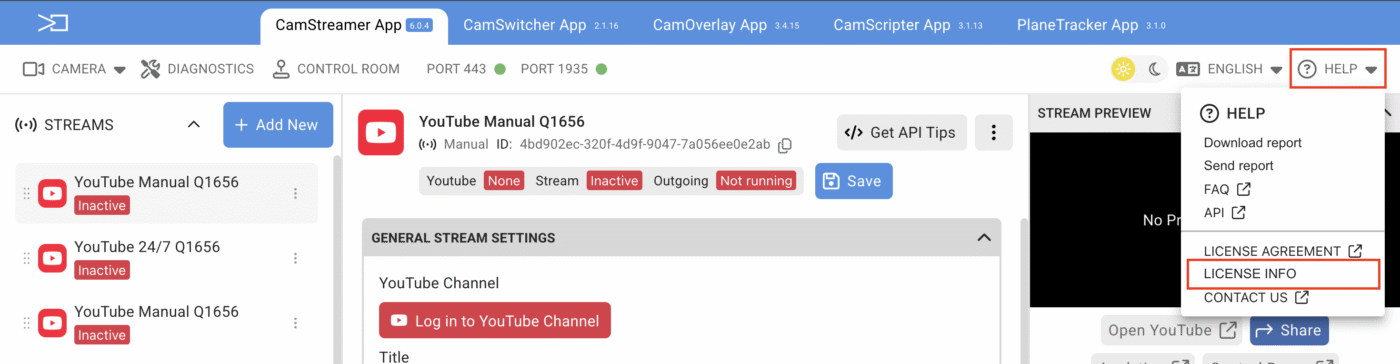
How do I locate my CamStreamer app license code?
On the CamStreamer app or the other affiliated apps:
Press Help and scroll down to the license info
Where to find CamStreamer report and Server report?
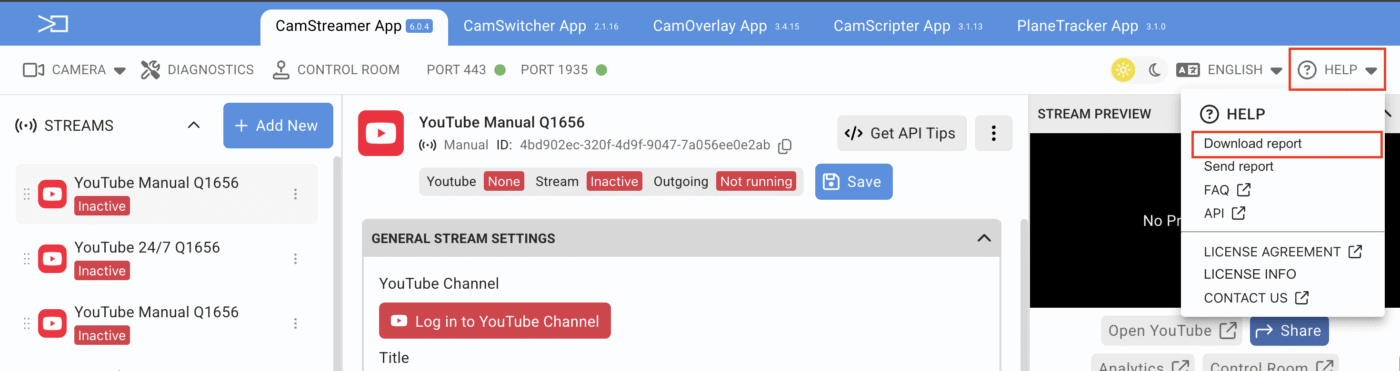
CamStreamer report
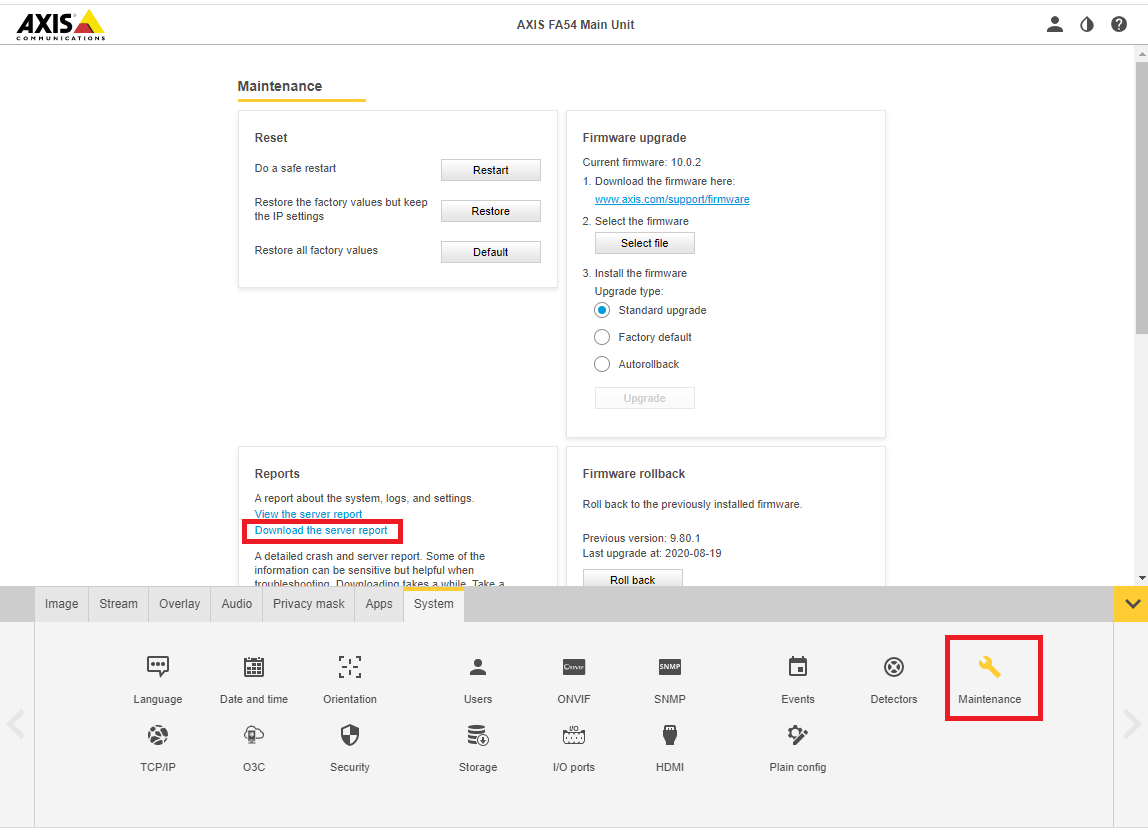
Server report – cameras with the latest FW utilising the New Web Interface
System> Logs >Report and Logs >Reports > Download the server report

Server report – cameras with latest FW utilising the Legacy Device Interface
System> Maintenance >Reports> Download the server report
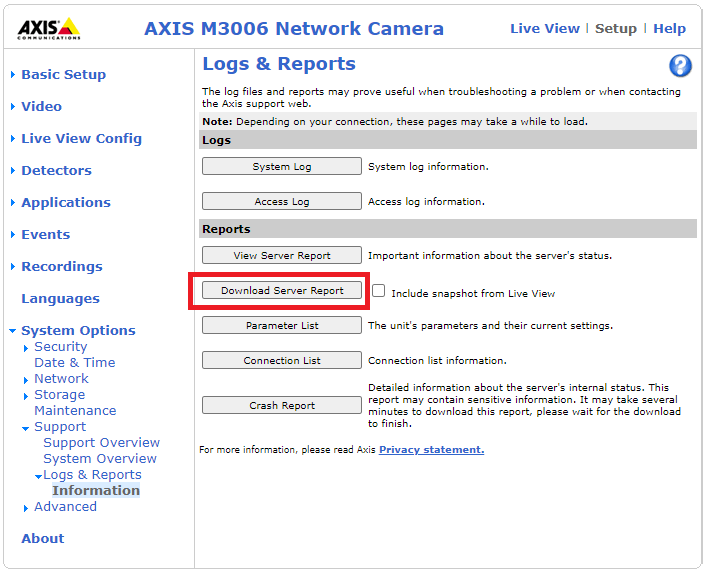
Server report – cameras with older FW
System Options > Support > Logs & Reports
Public PTZ Controls
To control your PTZ, you can use our cloud at the address https://cloud.camstreamer.com. Cloud is for camera administrators or guest accounts with limited rights.
To integrate public PTZ controls on your web page you have to do the following:
- use AXIS API to to control PTZ (whole moves or changing PTZ positions)
- solve situation when more users are on your page, so you need to write some queuing logic
- be carefull to do not disclose admin credentials in requests to API
Here is the link to the Axis API library: https://www.axis.com/vapix-library/subjects/t10037719/section/t10036011/display. You need to be registered as an Axis partner.