

 cs
cs ja
jaIntroduction / Tech-specs
The CamOverlay App is an intelligent application running directly inside an Axis network camera that allows you to embed dynamic graphic overlays—such as weather information, custom logos, and sports results—directly into your live stream.
Key Points
- Diverse Widget Selection: Supports a rich variety of dynamic graphics, including Weather (via AccuWeather), Info Tickers, Custom Graphics, and Picture-in-Picture options.
- Flexible Graphic Triggering: Overlays can be displayed manually, automatically via customized scheduling, via an external physical button, or via API commands.
- Full Channel Compatibility: Functions seamlessly across all camera channels and view areas at your chosen video resolutions.
- Mobile Control Panel: Includes a companion mobile app (iOS/Android) to list, toggle, and edit text overlay content on the go via CamStreamer Cloud.
Technical specifications
- Application type: In-camera ACAP app uploaded via a web browser or API.
- Camera compatibility: All Axis cameras with an ARTPEC 6/7/8/9 chipset.
- Free trial: 30 days.
- License: One-time payment or Cloud monthly subscription.
- Licensing methods: Via user interface (internet required) or via API.
- API: Fully supported.
- UI Languages: English, Japanese, and Spanish.
- Access to application: Locally via the web (device IP) or remotely via CamStreamer Cloud.
NOTICE
For more information, please refer to this datasheet.
Setup Guide
How to import/export the CamOverlay data file
On the CamOverlay UI go to Settings and select the appropriate action.
How to set up a Windows folder as a shared network storage for the camera and use it for CamStreamer applications
1. You will need to create a local/additional user on a PC/notebook device running Windows 11 OS and create a shared folder for storing images and fonts.
Everything is in the video, but be cautious about these steps:
– create a local user for sharing, which you will use for the camera
– use both options to share the folder
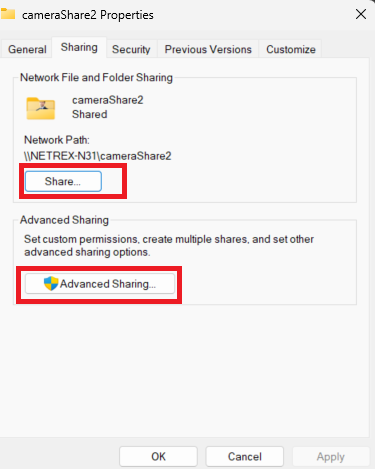
Important: when adding storage to the camera, check the option “Add share without testing”
2. You will need to upload the image from the network folder (where the image is already stored), add it to the CamOverlay Image Manager, and select the Image widget to display it.
Finally, you will need to upload the text from the network folder and select it to display in the CamOverlay widget, Infoticker (note that the text contains both English and Chinese characters).
The next step is to upload a font if needed (the default one doesn’t support characters like Asian or Arabic scripts) to ensure the text displays correctly. Once completed, restart the CamOverlay app to speed up the display results, as text from a text file is updated every 60 seconds.
NOTE: ensure the fonts have the correct file extension, ie TTF in order to work correctly, fonts can be downloaded e.g. here https://fonts.google.com/
Important: the path to the file stored in the shared storage is always in this format
file:///var/spool/storage/NetworkShare/text.txtHow do I remove the X (close feature of the CamOverlay Control Room)
Upon accessing the CamOverlay Control Room the X tab will be visible.
This feature allows you to exit the Control Room and return you to your working CamOverlay User Interface.

This will be your browser settings:
http://IPADDR[:PORT]/local/camoverlay/2-1-14/settings.html#controlRoomIf for any reason you do not wish to have this feature available, simply add the X in your browser settings and hit enter, afterwards refresh the browser. (as per the example)
http://IPADDR[:PORT]/local/camoverlay/2-1-14/settings.html#controlRoomXThis should be the end result with no X visible:

Use Cases:
This option comes in handy as a preventive/limited feature to the operator who enters changes/updates the score from a tablet or mobile device.
Bad colors on some ARTPEC-6 cameras
Some of ARTPEC-6 cameras have an HW bug in color interpretation which you can see in CamOverlay App and Store Occupancy Manager. We can detect that but you need to perform the following:
a) try to turn on/off the app

b) if it does not help, again turn off the app, go to System > Orientations and try to click on 0°, 180°, and back and turn on the application again

c) rotate your camera physically for 180° and restart the application
How much information can I display at the same time with CamOverlay App?
The number of visual elements you can render at once using the CamOverlay App depends primarily on the hardware capability of your Axis camera’s ARTPEC chipset.
Overlay Capacity by Chipset
- ARTPEC-6 Cameras: Support up to 4 overlays simultaneously.
- ARTPEC-7 and Higher: Support up to 8 overlays simultaneously.
Key Performance Factors These figures serve as general benchmarks rather than strict, hard-coded boundaries. The practical limit depends heavily on the size, resolution, and graphical complexity of the overlays themselves. High-resolution graphics or resource-intensive dynamic widgets consume significantly more processing power than simple text banners, which directly affects how many overlays your camera can seamlessly run at the same time.
General
Sportzcast Service
Please note:
We regret to inform that the Sportzcast service, which was available in the CamOverlay app, will no longer be available as a CamOverlay service.
This service feature will not be accessible anymore from the CamOverlay version 2.1.15.
The last CamOverlay version which supported this feature is 2.1.14.
My GIF does not work
If your GIF image does not work in CamOverlay App convert it here and use edited version.
Can I display some information (e.g. weather) over the video?
Yes. See application called CamOverlay App.
Services Setup Guide
How to display milliseconds in Custom Graphics service
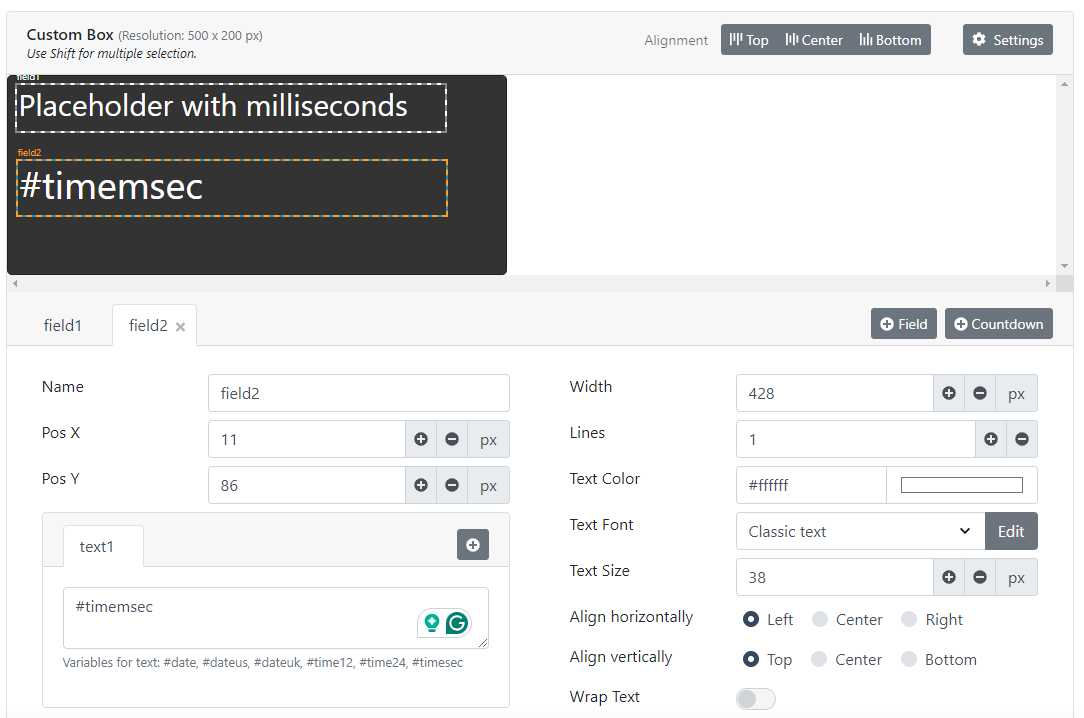
You can use the placeholder, #timemsec in the Custom Graphics service with a 25 frames per second refresh rate. Note that this function requires much higher processing power than the standard text or time which utilizes a 1 second refresh time. We advise you to use it with caution.
How to setup overlays/images for ptz positions on a non-ptz camera
Guide to setup PTZ positions:
Setup PTZ positions on a non PTZ camera
After setting up the various PTZ preset positions on the camera, proceed to the CamOverlay app to set up the various overlays.
Select service ID PTZ Overlay and setup/configure it as per your requirements.
Please watch the video below (or see it on YouTube via this link) for visual confirmation of the result.